This is my weblog... clicky on the linkies

Spelt biscuits

By John, 5 November, 2011

These are yummy. Ingredients:

2 cups whole spelt flour
1 tablespoon baking powder
1 teaspoon salt
6 tablespoons butter straight from the fridge
2/3 cup milk

Directions:

Preheat the oven to 450 degrees.

Combine the dry ingredients and mix well. Add the butter. You want to break it up with a fork (and knife if it is really cold) until the butter is in little pieces, no bigger than a pea. You want it like little crumbs almost. Those little butter pieces will melt while the biscuit is cooking, giving it a wonderful flavor. If you melt the butter and add it then it doesn't turn out as good.

After the butter is added, add the milk until it just becomes doughy. You may need a little more or less milk. When you have a good dough, just grab a hunk and pat it until it's 1/2 to 1 inch thick. Stick on an ungreased cookie sheet.

Bake for 12 to 15 minutes. Eat with butter and honey or jam. Or honey and jam. They will be a little crumbly, I usually eat mine with a fork.

Make radial labels for your DIY amp/stompbox/synth projects!

By John, 5 November, 2011

[Backstory: Over on the Cigar Box Nation forums, one of the guys asked where he could buy radial volume labels for an amp he built. This is a slightly edited version of my reply to him.]

Why buy some when it's easy enough to make your own? You don't have to be good at graphics, you just have to know what to do.

Download Inkscape (you probably want the Windows installer) and install it on your machine.

Create a new file. Go to File -> Document properties. Select inches instead of pixels for default units. And pick US Letter instead of A4 for paper size. (Or you can pick centimeters instead of inches and A4 instead of US Letter if you think in metric).

Select the circle tool on the left. Hold down the control key to fix the ratio of width to height and click and drag diagonally on the page surface to create a perfect circle.

You can tell what the diameter of the circle is because of the ruler that is running along the top and sides of the document (which is why we changed it to inches or centimeters instead of leaving it as pixels.) This is helpful if you know you need an inch and a half wide circle, for instance.

You should still have the circle tool selected in the toolbar on the left, and your circle should be selected in the document. Look at the top of the screen above your document. Click the "switch to arc" button. For "start" put in 120, and for "end" put 60. That will give you 300 degrees of rotation. If you want 320 degrees of rotation pick 110 and 70. Degrees of rotation should be on the datasheet for your potentiometer (or you can just eyeball it.)

Now select the text tool on the left. Type your numbers in the font you want with a few spaces between each number.

Select the Arrow tool on the toolbar. This will let you select multiple objects. Hold down the shift key and click your circle to select it, and then, still holding down the shift key, click your text. Both items should be selected. Go to the text menu and select "Put on path".

Your text should wrap around the circle. Now it's a matter of adjusting font size and adjusting the spacing between each number. Make sure the text tool is selected in the toolbar on the left and select a number. You should get an edit cursor. Adjust spaces between numbers as needed. At the top you should have an option to change the font and font size.

Once you've got the numbers going all the way around the circle the way you want, select just the circle (might be tricky but you can do it) and drag it away from the text. BAM, you've got your label.

If you want tick marks too, create another smaller circle, and just make the | character with even spaces between it and pick a suitable font. Slide the | | | circle into the text circle. Then use the text tool to create a regular label underneath the whole shebang.

Copy and paste as many times as needed.

When you're done, print it out on regular paper, cut it out, make a hole in the center, and test it to see if you like it. When you like it, print it out on and apply it according to directions. Lacquer as needed. :)

Tristan (not verified)

13 years 8 months ago

Where are the directions?

"print it out on and apply it according to directions. Lacquer as needed. :)"

Thanks, Tristan

Member for

14 years 3 months

John

13 years 8 months ago

Well, the directions depend on the brand and type of label stock that you use. So you'd have to get those from the source of your blank label sheets.

Petey Twofinger's Stella amp build

By John, 31 October, 2011

Way back in the mists of time, Petey helped me beta test my kit and helped smooth out the rough edges with the instructions. I asked him to write up his results on the forum, and he did. Now that the forums are no longer in beta, I can give a link to his great build documentation! I love where he put the knobs, right on the front where the speaker is.

The stella amp, as built by Petey Twofinger.

(The forums are ever so slightly still in beta -- I can't figure out how to put a log in link on the front page! If you are having problems logging into the forums, go to http://www.crazybutable.com/user and either create an account or log in, then go back to the forums and you should be able to post.)

Tags

Crazy cool 3D printed Stella Amp enclosure!

By John, 29 October, 2011

I was floored this morning when I opened up my e-mail and saw this 3D printed Stella amp enclosure! Check out those knobs!

A 3D printed Stella amp enclosure

Thanks Eli! Here is what he had to say about the enclosure and the build process:

Hey, just wanted send you a pic of my stella. I got it earlier this week (last week? don't even remember) and couldn't wait to put it together.

I printed a small enclosure on a 3D printer I have at work. All told, it was maybe 45 minutes of soldering, 20 minutes in solidworks, and I had a great amp! it sounds awesome when I hook it up to a very very large speaker.

I also hooked up an arduino to it and made some killer 8bit songs :)

Thanks for a great kit!

It's been a crazy couple of weeks

By John, 29 October, 2011

If you've been paying close attention around here you'll notice that I've started offering my Stella Amp kit for sale. As of now, all orders, even the international ones, have been shipped.

And if you've been paying even more attention to the internet tubes you will have noticed that I got a link from the fine folks at the Makezine blog. I got quite a few orders, and, due to a bug in my shopping cart software, more orders than I actually had kits for! Then I got sick... well, here, how about you read this version of the past couple of weeks that I wrote as a forum post over on the Adafruit forums:

It's been quite an interesting couple of weeks!

Last week I started selling Stella Amp kits on my website. I even got featured on the Make Magazine blog (http://blog.makezine.com/archive/2011/10/the-stella-amp-a-cigar-box-gui…), which was awesome! :) Of course, with every awesome, there are a few issues.

First, I almost immediately got terribly sick, which limited my ability to do... anything really. I went from feeling normal to horrible in a few hours. Sitting up and trying to use the computer caused some interesting hallucinations. This made it hard to ship kits. (Fortunately my wife was able to get a fair number of the orders shipped out right away.)

And wow, did we get a lot of orders! A lot of orders. In fact, after counting up the orders I wound up selling far more kits than I had in stock! :shock: Now, the e-commerce software I use (Drupal Commerce) is supposed to prevent this. But there was a wee little bug, it seems if a person ordered a kit, and paid for it on paypal, and then didn't click the button to bring them back to my website, my website didn't know that the order actually went through. So it didn't decrement the stock. And the order didn't show up in my list of orders. When I discovered this I quickly set the number of kits in stock to zero, but the damage had been done, I already had more orders than I had kits for. Also, the orders kept coming in, because even though the stock was set to zero, if someone had already put a kit in their cart, they could check out.

Fortunately, I had parts on hand to make enough kits for everyone who ordered one (and I had five left over; I sold three more and reserved two just in case anyone had problems receiving their kits). By Saturday I was feeling a lot better so we were able to get everything kitted up. But I had a bit of an issue, I couldn't actually see all of those orders. I got notifications from paypal that people had bought kits, but no address information.

I got my hands dirty and mucked about in the database for about an hour, and was able to produce a list of all shipping addresses. (Actually the first time I did it, I made a mistake and got a list of all of the billing addresses, and almost sent some kits to the wrong address, but I caught myself in time.)

I also discovered that I accidentally was charging 5.20 flat rate shipping once per item in the order, not once per order! So I had to issue a partial refund to the one guy who ordered two kits.

Oh, I also had to figure out how to generate packing slips / receipts. Just a teeny little oversight. First I did this complicated mail merge thing with excel and word that took hours to figure out, and looked really nice, but I quickly realized that it wasn't going to scale. I eventually figured out how to print out invoices from the website, which looks like poop, but has the advantage of being far quicker from a workflow standpoint. (Someday I'll figure out enough CSS to make it look better.)

I had no address label printer, so do you know how tedious it is to label that many kits by hand? And then wait in line at the post office as the clerk prints stamp after stamp after stamp? :roll:

Anyway, that did it for domestic orders, but there was another problem. Although I specified on the website that I would do shipping to the United States only, there was nothing preventing anyone from putting any address they liked into the shipping field. So I sold several kits to Canada and one to the Netherlands. Now I had to find a decent workflow for shipping overseas!

I eventually found Endicia. For a label printer I got a Dymo 4XL, which is large enough to let me print customs forms, addresses, and postage on one label that I can stick right on the package (everything is USPS small flat rate boxes.) For now, I'm just printing labels out by hand with their software, I haven't even tried to integrate it (I don't even know if it's possible).

I just finished up printing up the last of the international order labels and slapping them on boxes. Feels good to get all of this out and shipped. Sorry it took so long international customers but the website did say united states only, and I have to eat the extra shipping costs because I didn't charge you nearly enough for shipping.

Somewhere in there I ordered another round of parts for another round of kits and now I have a few more in stock in my store.

Oh, and to top it all off, after shipping kits to everyone on my list, I discovered that my list of shipping addresses included a few addresses which didn't correspond to a paypal payment! These are the guys who put the kit in the cart, entered their address, clicked next, made it to paypal, and didn't go through with a payment! Yet I mailed them kits because they were on my list of addresses. Oh well, what can be done. I hope they enjoy their free kit! :lol:

So after taxes, ordering an emergency shipping label printer, re-ordering all of the parts for the kits, not charging enough shipping for international customers, and accidentally shipping out free product, I think I'm about 100 bucks in the hole. :mrgreen: Hah! I'm sure it will all work itself out in a month or two.

At any rate, I have to say thanks Adafruit for having this great kitbiz resource. You guys are amazing, I cannot thank you enough. I never would have done any of this without you.

Tags

Drawing with charcoal

By John, 22 September, 2011

People draw with charcoal sticks, right? Charcoal sticks are expensive. Why can't I pick up some charcoal from a fire and draw with it?

A child's hands drawing with charcoal

Well, I can. And it works.... okay. The problem is it's hard to get a really deep black. Straight charcoal doesn't dig in to the paper, it sits on top of the paper. If I draw over a line I've already made, I'm pushing the other charcoal out of the way. There gets to be a bunch of it on the surface of the paper. And, of course, it's really easy to smear.

This picture shows how easy it is to smear charcoal on paper.

I guess the next step is to crush it and mix it with some kind of binder. If I use wax I'll get crayons, if I use clay I'll get conte crayons (broadly speaking).

At any rate, the kids had fun, and clean up was super easy because the dust didn't stick to anything and we tried to keep them from grinding it into the carpet.

A child's hands drawing with charcoal

Member for

14 years 3 months

noahgrey

14 years ago

I've done a lot of drawing with charcoal (store-bought, not "real," so not sure of the difference there), and in my experience it greatly depends on the kind of paper you use. Ordinary printer-type paper is too slick, but thick textured drawing paper will soak up more of the charcoal and give you much more leverage to play with its wide range of shadings. (And if you really want to get into it, it's also worthwhile to get some fixative, both so that you can do multiple coats and so that you can preserve what you want to keep -- without it charcoal drawings will smear and fade at the slightest excuse, especially on regular paper.)

Member for

14 years 3 months

John

14 years ago

Hmmmmmm... so maybe my charcoal is just charcoal then?

I made some charcoal sticks of my own while on vacation. I put some maple sticks in tinfoil and threw them in a fire. The tinfoil was too thin and several packets got breached and flamed up before I figured out what was going on. I fished the rest out of the fire and clipped off the parts that were on fire and burned myself and... yeah. Then my kids got ahold of the remaining sticks and now I have stick pieces.

Next time I'll make it in the grill. Then a log won't land on it.

Anonymous (not verified)

13 years 12 months ago

When making your own charcoal stick you shouldn't open whatever they are sealed in until they've cooled off.

Stella Amp build update

By John, 24 August, 2011

I've been building one of my Stella Amps into a cigar box. I've been taking pictures the whole time, and some day I'll collect them all to one post. But for now I'll post what i just finished up.

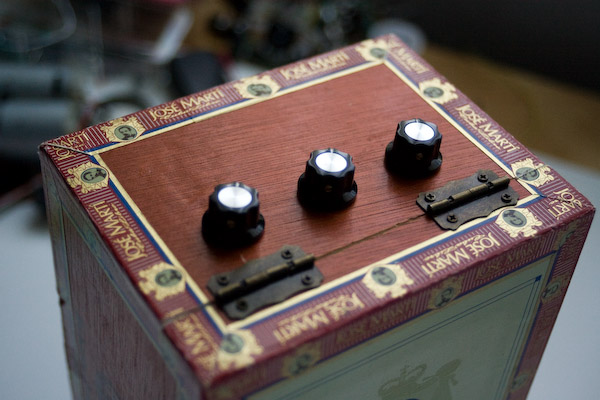
Here in this pic you can see the knobs I just put on, and the new hinges. The old hinges were push-in cheap shiny brass and they fell apart pretty quick. (My kids might have had something to do with that.)

New (old) hinges on my cigar box amp.

The new hinges came off an old jewelry box my wife didn't care about any more. I don't know what she did with her jewelry box, but I got the hinges. I had to be real careful to avoid over-tightening the screws with that soft plywood.

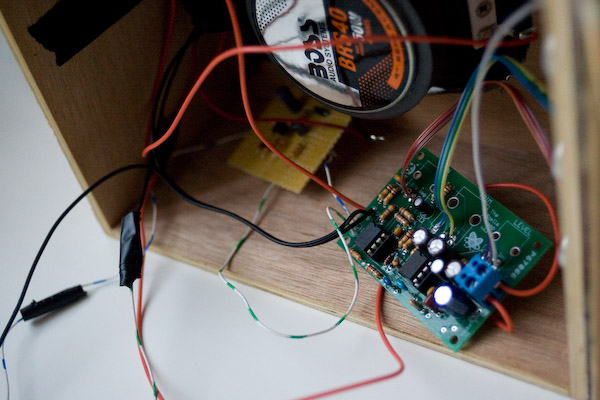
The inside of the cigar box amp.

This is what it looks like on the inside of the cigar box. I don't have anything mounted yet (need to get the right kind of screws). I took off all of the tape holding everything to the sides so you can see the internals. Here you see the Stella amp, and in the back, you can see the Tillman preamp I put in. The speaker is a 50W Boss car audio speaker.

Next step is mounting everything securely, including a new 4xAA battery holder. I also need to make a hole for the input jack and some labels for the controls.

Member for

14 years 3 months

John

13 years 11 months ago

It sounds fabulous. I have some video of it but I haven't put together the footage and edited it yet. One thing I really like about it is using it for an ipod amplifier. Yeah, it's not stereo, but I love playing old mono jazz recordings through it. And podcasts are great, because the cigar box gives it a little bit of an old time radio feel.

Another thing that's great about it is practicing the bass. Yes, it's very quiet but that's what's so great, I can take it all over the house when the kids are asleep and never worry about waking them up.

Chris (not verified)

13 years 11 months ago

I built one of your kits and it's fantastic. I did happen to destroy my c11 capacitor. You says its ceramic. Would that be multilayered ceramic? You got a digikey or could suggest something I could sub it with? Thanks!

Ps. I soldered my remaining resistor into rpd2. There wasnt anything for it on the build page. Is that right?

Member for

14 years 3 months

John

13 years 11 months ago

I'm glad to hear that you like it! Let me know if you have any build photos or if you make a video of it, I'd love to see it!

The digikey part number for C11 is 445-2857-ND. Any 1 uf, non-electrolytic capacitor should work just fine.

Rpd2 isn't going to hurt anything. It is an optional part that you only need if you are using the amp as a stomp box. It is there to help remove pops when you stomp on your stompbox. But if you are using the Stella as an amplifier and powering a speaker, the resistance of Rpd2 is so high it's not going to affect the amp output.

pcdjviro (not verified)

13 years 10 months ago

Hello I bought your Stella Amp when it was featured on Make's Site. I'm powering this unit with a switch mode power supply at 11 volts. Can you suggest a speaker for this current setup? I dont want to waste any cash on something that wont sound well. I have read about car speakers being installed. Is there anything special involved in the setup using that kind of speaker?

Member for

14 years 3 months

John

13 years 10 months ago

Well, I don't know how big of an enclosure you'd like to put it in. Any speaker 4 inches or larger that handles 3 watts or more will probably be great. Either 4 or 8 ohms is fine.

For a cigar box amp (or even a little larger) I like these: http://www.amazon.com/BRS40-Replacement-Individually-Packaged-Clamshell…

The 3.5 inch in that line of car speakers is too small and I don't really like it as a general purpose amp. It doesn't have enough bass for me, although maybe if I had it in a more rigid, air tight enclosure it would work better.

One thing to watch out for is make sure you are getting a full range driver. I got a nice 10 inch speaker but I can't get any highs out of it. (I might pair that 10 inch with the 3.5 inch boss one!)

Eric (not verified)

11 years 9 months ago

I have a box that's going to be a bit larger... what is your standard size of speaker you like to use? I mean, if not constrained by size limits? Any particular one you'd recommend?

Sentences to ponder:

By John, 17 August, 2011

The National Security Agency wrote the Security Enhanced Linux extensions which are now a fundamental part of Red Hat and a few other distributions. The work the NSA did made it so secure that Linux is now the most secure operating system certified by the Russian government.

That is from Red Hat's CEO at LinuxCon. The rest of the article is Linux hagiography if that's your thing.

Anonymous (not verified)

14 years 1 month ago

Showing yet again the usability and security are inversely proportionate.

Let's make mistakes: experiments

By John, 9 August, 2011

Here are some recent experiments I've tried:

Making tapioca pudding from scratch, using real vanilla beans: partial success. I never made pudding from scratch before. The pudding recipe (on the bag of tapioca balls) was extremely finicky, it took hours, and never did set. On the other hand, the vanilla bean (I used a half a bean) was a huge hit, and overall it tasted amazing.

Adding vanilla extract to lime flavored seltzer water: success. The lime flavoring was pretty bad, especially when compared to actual lime juice (which is what I had been using to flavor plain seltzer water for the past few weeks or so.) I added the vanilla extract and it's actually pretty good.

Adding Worcestershire sauce to lime flavored seltzer water: failure. Well, how are you going to know if you don't try? (The lime interacted with the Worcester and it was really bad.)

Adding tabasco sauce to lime flavored seltzer water: more data needed. I didn't like the vinegary taste but I loved the spicyness exploding with the carbonation. Maybe straight cayenne powder mixed in would work?

Steaming bitter lettuce greens: failure. We had some lettuce in our garden that had turned far too bitter from the heat. I thought I'd steam it to see if I could get the bitterness to go away. It didn't.

Steaming cucumbers with dill: success. This one was a surprise to me. Steamed cucumbers are a bit firmer than zucchini or yellow squash but are nice and mild and have a slight flavor that is only vaguely reminiscent of cucumber. It actually tastes... well, like a completely new vegetable. Next time I will season them a little more heavily.

Amy (not verified)

14 years 1 month ago

If you're wanting to experiment more with vanilla beans, search for them on ebay. There's a reputable seller on ebay whose prices are delightfully low. I've sent a few packages of vanilla beans to my friends.

For the bitter greens, two thoughts: some acid flavors might've helped, and you might've needed to braise the greens for a long time. It's how endives and collards are made palatable.

Member for

14 years 3 months

John

14 years 1 month ago

Amy, thanks for the tip. What I actually did was wash them, lightly shake them off, put them in tinfoil with some oil and threw it on a grill.

And you don't have to cook collard greens that long if you cook them in bacon grease. :)

The Sinister Minister

By John, 6 August, 2011

I want to show you something amazing. This video is in two parts. Here is the first one. It's a great performance of The Sinister Minister by Bela Fleck and the Flecktones. Note especially the flute and banjo parts, they're very good.

But that video is just the warm up. The real amazing part of this song is Victor Wooten's bass solo, which lasts for most of the second video. And I want to call a bit of attention to something that happens early on in the solo:

Victor breaks a string.

Well, people break strings all the time on stage, right? But I watched this video about 10 or 15 times without noticing it. Wooten's performance is so good, it's hard to imagine that he is actually missing a string for most of his solo. Even after someone pointed it out to me, I still missed the spot where he broke the string, several times.

Here is a handy timeline. I bolded the important bits.

1:29 We can clearly see that he has all four strings.

2:24 This is some amazing slap bass.

2:39 I love the chord strum here!

2:47 He breaks the string and pauses. But the pause feels dramatic. It doesn't feel like there's anything wrong, it feels like he meant to stop there for emphasis.

2:49 He breaks into a simpler low key groove to give himself time to think.

2:56 Fast hand flick to move the string out of the way.

3:05 He's keeping it simple but varying it it up a bit. Clearly still thinking about what to do next. Remember this solo is a big deal, it's supposed to end on a super intense note before the rest of the band all comes back in. This is the last song in the set, he can't just trail off and end the song.

3:12 Back to the groove. Still thinking. Not only does he have to improvise his way through the rest of the solo, he has to play a quite distinctive main bass line when his solo is done... while missing the G string. More on this later.

3:21 Still thinking... Let's see how gets out of this.

3:50 I love how you can see the string just hanging there.

4:48 He tries to yank the string off but can't

5:05 String flying in the breeze

5:19 Ever so slightly reminiscent of "Play That Funky Music"

5:30 So amazing.

6:00 What the hell is going on here.

6:20 This rhythm stuff is amazing, he's fretting the notes on the neck to get the right chords when he bangs the strings.

6:30 Notice that he starts slapping all the strings with no fretting. It's great but kind of cacophonous and musically dissonant. There is a pause as Futureman steps in to cover for what happens next. Hard to tell with the camera angle but Victor probably gave some look or signal that brought him over.

6:37 Finally gets the string off and hands it to a fan in front

6:41 This is critical! We see him retuning his bass! In particular we see him tuning the E string. He's probably tuning it up a whole step to F#. This would give him an inverted D chord if he slaps all the strings at once without fretting them. Remember when he's done with the solo he needs to get back to the regular sinister minister bass line... but he doesn't need the E string for that. He does need the G string which he broke, but when he finishes his solo and starts up the main bass line you can see he improvises by playing way higher on the neck to get the notes he needs on the D string. Of course he then has to ether be extremely fast to move up and down the neck to get the notes he needs on the A string or he has to transpose the rest of the bass line to his re-tuned E and A string. I think he does a little of both but I get ahead of myself. (There's also a possibility he re-tunes more than one string here. That invalidates some of what I said above but makes any transposing he has to do later more impressive.)

7:05 We see the results of retuning here as he slaps all the strings and it sounds so good compared to the cacophony earlier. Note that the rest of the solo is rhythmic, not melodic.

8:52 Back to the main groove.

And that, my friends, is a professional at work.

Putting all of this together, I was strongly reminded of David Foster Wallace's essay on Roger Federer, specifically Federer's ability to see several steps ahead in the game and maneuver his opponents without them realizing it:

Federer is able to see, or create, gaps and angles for winners that no one else can envision, and television’s perspective is perfect for viewing and reviewing these Federer Moments. What’s harder to appreciate on TV is that these spectacular-looking angles and winners are not coming from nowhere — they’re often set up several shots ahead, and depend as much on Federer’s manipulation of opponents’ positions as they do on the pace or placement of the coup de grâce.

If you want an MP3 of this performance, it's freely available on archive.org. The original song is also not to be missed; it was released in 1990 on their self titled album Bela Fleck and the Flecktones.